This section discusses the steps required for processing “New Investment Permit (IP)”, both form the Investor and Officer side.
The Investor starts the service request by selecting “New Investment Permit” From the list of services provided on the Investor Dashboard. The system presents a multi-step tabbed interface that allows the investor to provide the required data in sequential steps.
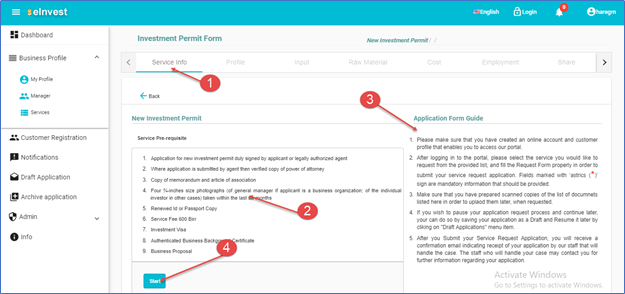
Step 1. Basic requirements
- The first step shows the basic requirements of the requested service as well as information on the steps required to complete the application form.
- After reviewing the provided information, the Investor clicks “Start” button to start the application process.
Step 2: Provide Project Profile Data
In this step, the Investor is required to provide basic data about the new Investment Project, as shown below.
- Make sure that the “Profile” step (tab) is actively selected
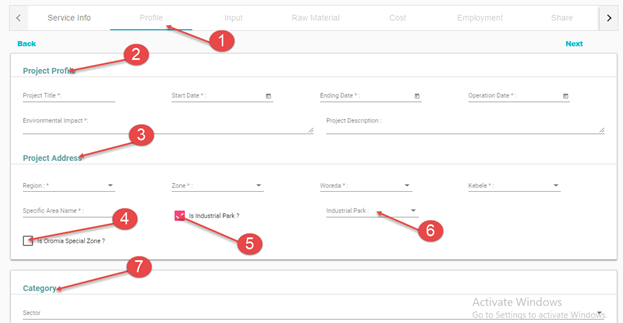
- Enter data about the project profile - project title, start date, ending date, operation date, environmental impact and brief project description.
- Enter data about the project’s address. All fields are optional, except the region at which the project is located.
- Check the “Is project located in Oromia Special Zone?” check box if the project is found in Oromia special zone. This data is required later when checking eligibility of the project for different incentives
- Check if the project is located at one of the existing industrial parks
- Select the industrial park from the given list.
- Select the investment category.
- Click “Save” to store the data on the central database and move to the next step.
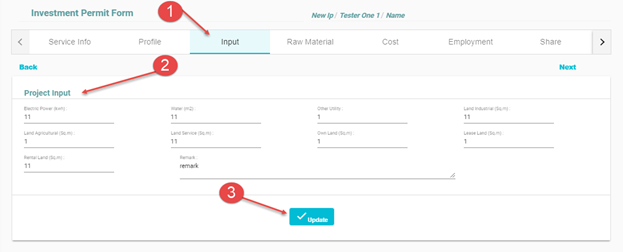
Step 3: Provide Project Input Data
This form is used to accept data about different utilities required by the new project.
- Make sure that the “Input” tab is actively selected
- Fill data about electric power, water, and land use requirements
- Click save/update. The system will validate the form, save data and redirect to the next step.
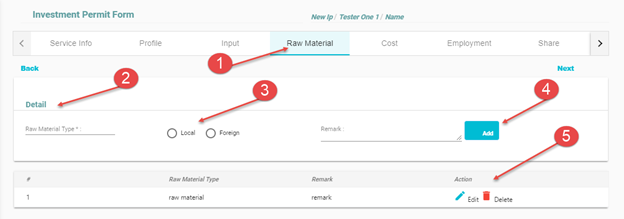
Step 4: Provide Raw Material Data
This form is used to capture data about the raw materials requirements for the new investment project.
- Select the “Raw Material” tab (step)
- Investor fills raw material data - material type and remark
- Select whether it is local or foreign material
- Finally click the Add button. The above steps are repeated for each material type.
- The list of entered materials will be displayed as show below, and the user can edit or delete item from the list.
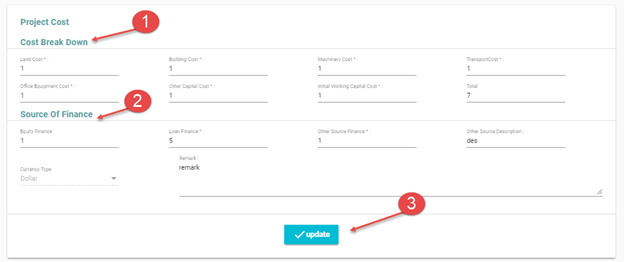
Step 5: Provide Project Cost Data
The form uses the cost estimation for the project
- After selecting the “Cost” tab, user fills the cost break down - land cost, machinery, building cost, Transport Cost, Office Equipment Cost, Other Capital Cost and Initial Working capital cost.
- Investor fills the source of finance data - equity finance, loan finance, other source of finance.
- Finally click Save/Update button
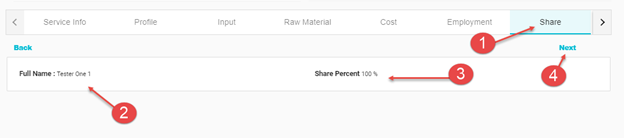
Step 6: Provide Project Share Data
This form is used to capture shows data about ownership shares in percent.
- User selects the “Share” tab
- If the legal status of the ownership is “Sole Proprietorship”, the system automatically displays the owner’s name and 100% share.
- Otherwise, user selects the Nationality, the number of shareholders from the selected nationality and the capital investment percentage of owned by investors of the selected nationality. This step is repeated for all investors of distinct nationalities.
- Clicks
 to move to the next step.
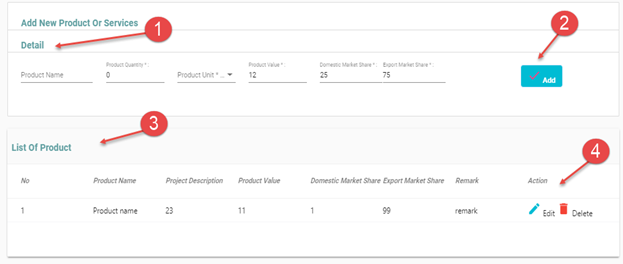
Step 7: Provide Data about Products or Services
This form is used to capture data about the intended products and/or services of the project.
- User selects the product tabs and fills the details of the product/service - product name, product quantity, product unit, product value and market share.
- Click the
 button
- List of Products and/or services entered is displayed.
- The user can edit or delete the product, as required.
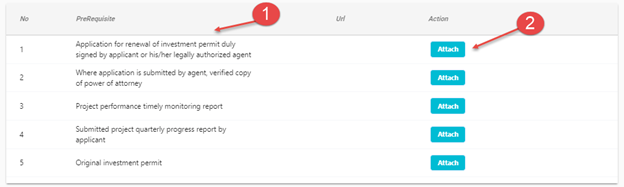
Step 8: Attach required documents
In this step, the system presents the list of documents that need to be uploaded for the selected service based on the rules defied in the “Settings” module of the system.
- Investor clicks “Attach” button located to the right of each required document.
- System displays the filename of the attached document.
- The above steps are repeated for each document requirement
Step 9: Select Manager
This is used to assign a manager for the actual project, from the list of Managers that are already stored in the system.
- User selects the “Manager” tab.
- The user can add new manager using
 button, if not listed here. The system redirects to manager registration form.
- Click the checkbox next to the Manger from the available list of managers.
- Click the submit button. The system saves the provided data and moves to the next step.

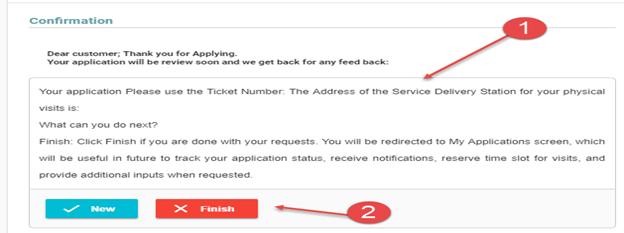
Step 10: Confirmation
Up until now, the data provided by the Investor is saved in “Draft” mode and is available to the customer only. This is the last step that allows the Investor to submit the application so that an authorized EIC Officer can review and make the necessary decision.